Trail Camera Overview

Trail cameras have been around for a long time now. Most every hunter has one and would consider themselves experts when it comes to using them. However, through the years, some hunters have become a bit lazy when it comes to setting out a camera. They choose the easiest tree and strap the cam up waist high and turn it on. While this method could work to an extent on some brands, it’s not what was originally learned. Just like with every male being, the instructions on how to set up a trail camera have been tossed out the window. Is setting up a camera “just right” all that important though? We believe so. Here’s why: we see thousands of setups, field thousands of phone calls, and have become well-versed in set up in the last 4 years. If you want maximum performance out of your SmartCam or any trail camera, you need to learn how to set them up correctly. You’re putting a camera with infrared lights and motion sensors running on batteries out in extreme elements. So yes, we believe it’s very important to learn how to set up a trail camera correctly. In this article, we will reintroduce the instructions on how to set up a trail camera (specifically for our SmartCams).

Setting up a Camera

The simplest steps of setting up a trail camera are inserting batteries and an SD card. We recommend using external power, but if you plan to use AA batteries, we recommend lithium AA batteries. However, with our SmartCams, we highly suggest using an external power source (12v battery or Solar Panel) as cell cameras are very power-hungry. What’s the point of having a cell cam if you’re out changing batteries in them every other week? When choosing an SD card, we recommend using a 32GB, Class 10 SD card. We have our own WiseEye SD cards, but you can find these cards pretty much anywhere as well. We’re not going to go through the step-by-step process of registering your SmartCam in this article. You can find that HERE. After following the process of setting up your SmartCam, it’s ready for field use.

Choosing Settings and a Location

When selecting a location for your camera, there are a few things to consider. Will the camera be in a field or in the woods? Will it be placed on a trail or in front of a food source? The answer to these questions will help determine your settings for the camera. For instance, if you are placing your camera in the woods on a deer trail, having your delay setting as low as possible with burst mode will be the best option for that scenario. This way you can catch deer that are passing through quickly. Do you anticipate the target motion coming from the front or back of the cam? Is left to right better? We think left to right or right to left has a better shot of triggering the motion detector. Especially if a buck is chasing a doe. However, if you plan to place the camera on a field by a food source, choosing a longer delay time (1-5 min) with a time-lapse of every hour is a good option. This way you’re not getting hundreds of images of a doe feeding and, the time-lapse every hour can see if deer are feeding out further than the camera can detect. Another thing to consider is which way the camera will be facing. Facing the camera East or West can cause washed-out images as the sun will be directly facing the camera at sunrise or sunset. Washout can also happen in the woods by limbs, trees, or vegetation reflecting the infrared light. So be sure to clear out any obstructions in front of the camera.

Camera Placement

Lastly, but most importantly, is camera placement. This is where most hunters have lost the instructions. It’s not just the hunter’s fault though. Camera companies have done a poor job of explaining proper camera placement. We want our customers to get the most out of their cameras. The ideal camera placement for our SmartCams is 5ft off the ground at a 5-15 degree downward angle. This is to get the maximum performance out of the Infrared lights and maximum broadcast of the motion detector beams. It also helps get the best overall image clarity.

Motion Sensor

Let’s explain first how the motion sensor works. The detection area of the motion sensor spreads out like fan blades that do not move. Notice on the engineering drawings that the camera’s height and tilt are shown. The ‘sweet spot’ in the detector is 15-20 feet. It can read much further and much closer. Study these drawings and you begin to see how it works. Is it possible to set it up differently and still find success? Of course, we’ve had many customers do things differently and get some amazing images. However, it is not recommended. How to find the sweet spot zone? Take a picture and draw a line from the top to the bottom diagonally from both ends. Where does the X find the center? Draw an area around that Center and that’s where the sweet spot is. Here are some questions to ask after you’ve set up your camera. Is the camera on a hill? If so, adjust the tilt accordingly. Is there a tree blocking one of the motion sensor’s “fan blades”? If so, adjust the camera left or right to aim around the tree. Turn the camera on and walk around to see if it is picking you up. If not, you may need to make some adjustments. There are many variables when it comes to picking up motion, but if you follow these tips, you will see a major improvement and catch a lot more motion. 

Infrared

Placing the camera 5ft high at a 5-15 degree downward angle is also the ideal height for the infrared range. Having the camera too low will cause a bright spot closer to the camera as the infrared light isn’t dispersing out to its maximum range. Having the camera too high can shoot the infrared over the top of the subject causing dark images.

Finally, camera placement is key when it comes to picture quality. The photos above are a great example of this. As you can see, with the camera too low it can cause light to bounce off the ground and onto the subject causing motion blur. Motion blur cannot be eliminated completely, but it can be reduced with the correct placement and settings. To help compensate for nighttime motion blur, the camera has three-night mode settings, Min. Blur, Balanced, and Max Range. Use these settings along with the correct camera placement to get the best overall infrared images.

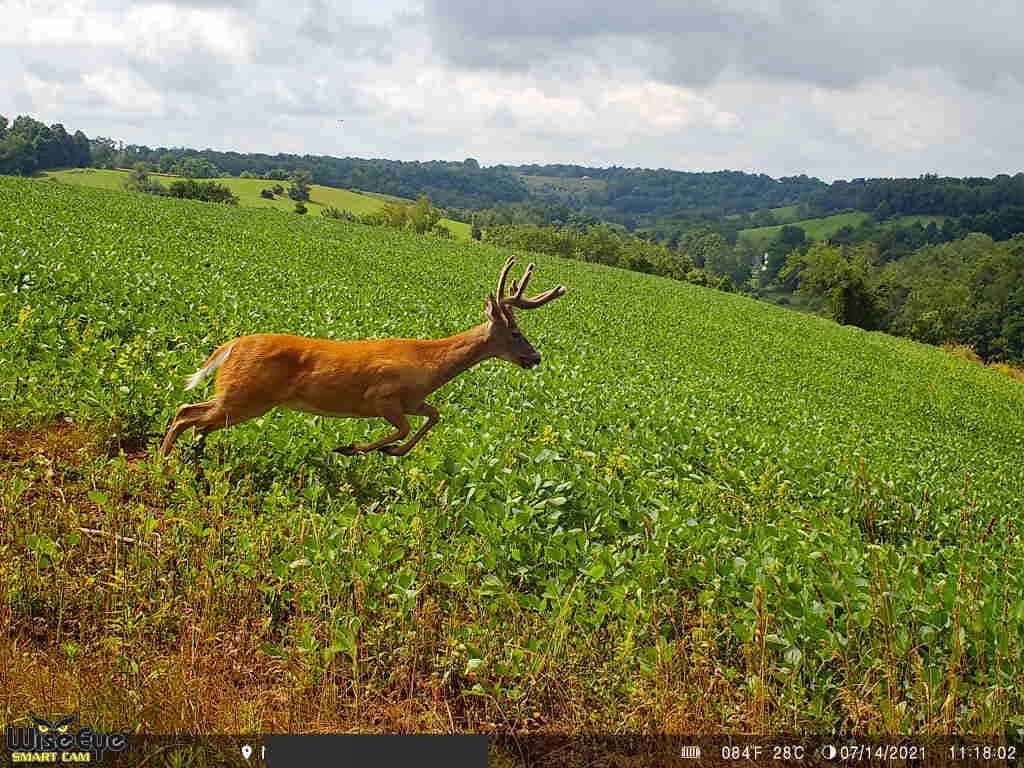
As you can see, camera placement is extremely important and should not be overlooked. Next time you experience your camera missing pictures, trouble with the infrared range, or have motion-blurred images, think about how you have the camera placed and make the proper adjustments. Do not be afraid to move your cam around till you find the perfect spot to get pics like this: